In this Flutter guide, we will be learning how to use Flutter image asset. We will first see what Flutter image asset is, then we will implement it using an easy Flutter code example for proper understanding. I hope that after reading this post, you will easily use Flutter image asset in your own Flutter apps.
What is Flutter Image Asset?
It defines the process of taking image from the local asset and using/displaying it in the Flutter app. We will be practically implementing it with a proper example.
Implementing Flutter Image Asset(All Steps)
In order to implement Flutter image asset, we have to follow these steps.
Step 1

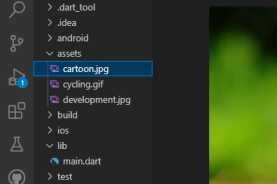
Creating a folder in the app directory of name assets and pass it the image file as shown in the above image.
Step 2

Now uncomment the asset statement in the pubspec.yaml file as seen in the above image.
Step 3
Now comes the coding part. For that, we have to use the Image.asset constructor. It takes a complete path of the image file. See the below code for practical understanding.
Image.asset(
      'assets/development.jpg',
      height: 200,
      width: 200,
      fit: BoxFit.cover,
    )


Conclusion
To conclude, we have practically implemented Flutter image asset and have discussed it step by step so you can easily use Flutter image asset in your own Flutter apps.
Thanks for reading.
