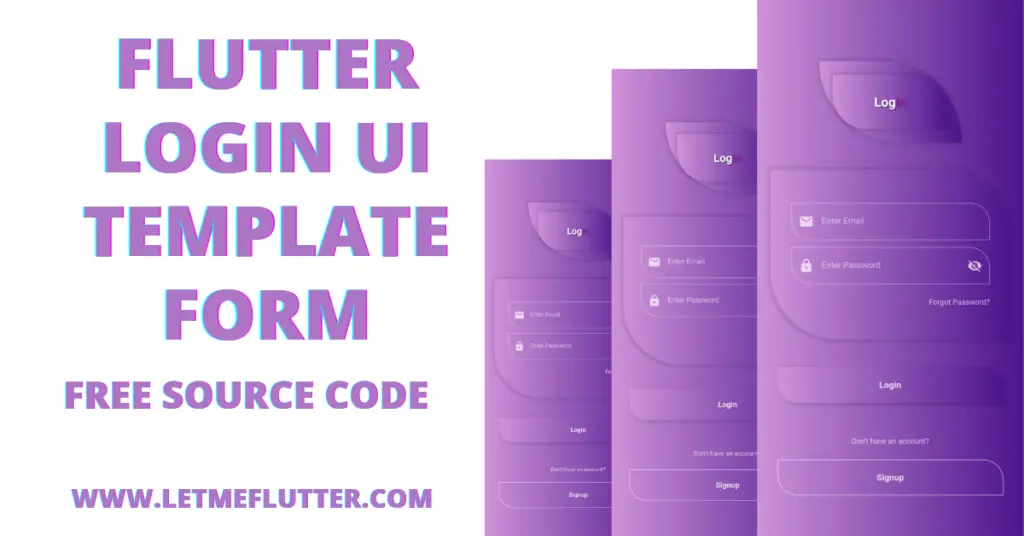
In this article, we will be creating a beautiful Flutter login UI form template, but first, if you want a complete setup on how to install flutter on windows and build your flutter app instantly, then click here, Let’s jump right into creating the beautiful mentioned flutter login UI form template.
Outline
- Implementing Flutter Login UI Form
- Screen Background Color Of Flutter Login UI
- Title Text Of Flutter Login UI Template
- Email And Password Flutter Textfields
- Forgot Password Clickable Flutter Text Widget
- Login Clickable Flutter Container Button
- Signup Clickable Flutter Container Button
- Source Code Of Beautiful Flutter Login UI Form Template
- Conclusion
Implementing Flutter Login UI Form
Let’s create this beautiful Flutter login UI form step by step.
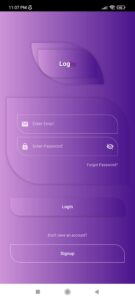
Screen Background Color Of Flutter Login UI
Container( height: double.infinity, width: double.infinity, alignment: Alignment.center, decoration: BoxDecoration( gradient: LinearGradient( colors: [Colors.purple.shade200, Colors.purple.shade900])),)
Title Text Of Flutter Login UI Template

Container( height: 120, width: 210, decoration: BoxDecoration( gradient: LinearGradient(colors: [ Colors.purple.shade200, Colors.purple.shade900 ]), boxShadow: [ BoxShadow( blurRadius: 4, spreadRadius: 3, color: Colors.black12) ], borderRadius: BorderRadius.circular(200).copyWith( bottomRight: Radius.circular(0), topLeft: Radius.circular(0))), child: Container( margin: EdgeInsets.all(20), decoration: BoxDecoration( gradient: LinearGradient(colors: [ Colors.purple.shade200, Colors.purple.shade900 ]), boxShadow: [ BoxShadow( blurRadius: 4, spreadRadius: 3, color: Colors.black12) ], borderRadius: BorderRadius.circular(50).copyWith( bottomRight: Radius.circular(0), topLeft: Radius.circular(0))), child: Row( mainAxisAlignment: MainAxisAlignment.center, children: [ Text( 'Log', style: TextStyle( fontSize: 22, fontWeight: FontWeight.bold, color: Colors.white, shadows: [ Shadow( color: Colors.black45, offset: Offset(1, 1), blurRadius: 5) ]), ), Text( 'in', style: TextStyle( fontSize: 22, fontWeight: FontWeight.bold, color: Colors.purple.shade600, shadows: [ Shadow( color: Colors.black45, offset: Offset(1, 1), blurRadius: 5) ]), ), ], ), ), ),
Email And Password Flutter Textfields
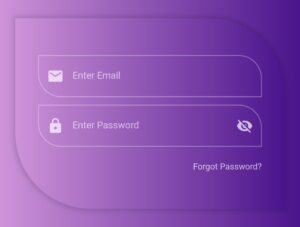
Padding( padding: EdgeInsets.symmetric(horizontal: 30) .copyWith(bottom: 10), child: TextField( style: TextStyle(color: Colors.white, fontSize: 14.5), decoration: InputDecoration( prefixIconConstraints: BoxConstraints(minWidth: 45), prefixIcon: Icon( Icons.email, color: Colors.white70, size: 22, ), border: InputBorder.none, hintText: 'Enter Email', hintStyle: TextStyle( color: Colors.white60, fontSize: 14.5), enabledBorder: OutlineInputBorder( borderRadius: BorderRadius.circular(30) .copyWith( bottomRight: Radius.circular(0), topLeft: Radius.circular(0)), borderSide: BorderSide(color: Colors.white38)), focusedBorder: OutlineInputBorder( borderRadius: BorderRadius.circular(30) .copyWith( bottomRight: Radius.circular(0), topLeft: Radius.circular(0)), borderSide: BorderSide(color: Colors.white70))), ), ),
Forgot Password Clickable Flutter Text Widget
In our beautiful Flutter login UI for, we will use the forgot password textfield. Forgot password text is the text widget that you see below the password Flutter textfield. We wrapped it with a gesture detector class so now it is clickable and we can specify some actions that will be triggered when we tap on the forgot password text.
Login Clickable Flutter Container Button
GestureDetector( onTap: () {}, child: Container( height: 53, width: double.infinity, margin: EdgeInsets.symmetric(horizontal: 30), alignment: Alignment.center, decoration: BoxDecoration( boxShadow: [ BoxShadow( blurRadius: 4, color: Colors.black12.withOpacity(.2), offset: Offset(2, 2)) ], borderRadius: BorderRadius.circular(30).copyWith( bottomRight: Radius.circular(0), topLeft: Radius.circular(0)), gradient: LinearGradient(colors: [ Colors.purple.shade200, Colors.purple.shade900 ])), child: Text('Login', style: TextStyle( color: Colors.white.withOpacity(.8), fontSize: 15, fontWeight: FontWeight.bold)), ), ),
We have given the container a gradient color in our Flutter login UI form design, decorated it edges using the border radius, given the container a shadow and a child flutter text widget. We wrapped the Flutter container with a flutter gesture detector class. Now we can specify some functions that will be performed when we click on this clickable container button.
Signup Clickable Flutter Container Button
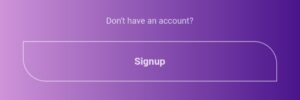
Container( height: 53, width: double.infinity, margin: EdgeInsets.symmetric(horizontal: 30), alignment: Alignment.center, decoration: BoxDecoration( border: Border.all(color: Colors.white60), borderRadius: BorderRadius.circular(30).copyWith( bottomRight: Radius.circular(0), topLeft: Radius.circular(0)), ), child: Text('Signup', style: TextStyle( color: Colors.white.withOpacity(.8), fontSize: 15, fontWeight: FontWeight.bold)), ),
Source Code Of Beautiful Flutter Login UI Form Template
import 'package:flutter/material.dart'; void main() { runApp(const MyApp()); } class MyApp extends StatelessWidget { const MyApp({Key? key}) : super(key: key); @override Widget build(BuildContext context) { return MaterialApp( title: 'Flutter Beautiful Login Template', debugShowCheckedModeBanner: false, theme: ThemeData( primarySwatch: Colors.purple, accentColor: Colors.purple, primaryColor: Colors.purple, focusColor: Colors.purple, cursorColor: Colors.purple), home: Homepage(), ); } } class Homepage extends StatefulWidget { const Homepage({Key? key}) : super(key: key); @override State<Homepage> createState() => _HomepageState(); } class _HomepageState extends State<Homepage> { bool isPasswordVisible = false; @override Widget build(BuildContext context) { return SafeArea( child: Scaffold( body: Container( height: double.infinity, width: double.infinity, alignment: Alignment.center, decoration: BoxDecoration( gradient: LinearGradient( colors: [Colors.purple.shade200, Colors.purple.shade900])), child: SingleChildScrollView( child: Column( children: [ SizedBox( height: 50, ), Container( height: 120, width: 210, decoration: BoxDecoration( gradient: LinearGradient(colors: [ Colors.purple.shade200, Colors.purple.shade900 ]), boxShadow: [ BoxShadow( blurRadius: 4, spreadRadius: 3, color: Colors.black12) ], borderRadius: BorderRadius.circular(200).copyWith( bottomRight: Radius.circular(0), topLeft: Radius.circular(0))), child: Container( margin: EdgeInsets.all(20), decoration: BoxDecoration( gradient: LinearGradient(colors: [ Colors.purple.shade200, Colors.purple.shade900 ]), boxShadow: [ BoxShadow( blurRadius: 4, spreadRadius: 3, color: Colors.black12) ], borderRadius: BorderRadius.circular(50).copyWith( bottomRight: Radius.circular(0), topLeft: Radius.circular(0))), child: Row( mainAxisAlignment: MainAxisAlignment.center, children: [ Text( 'Log', style: TextStyle( fontSize: 22, fontWeight: FontWeight.bold, color: Colors.white, shadows: [ Shadow( color: Colors.black45, offset: Offset(1, 1), blurRadius: 5) ]), ), Text( 'in', style: TextStyle( fontSize: 22, fontWeight: FontWeight.bold, color: Colors.purple.shade600, shadows: [ Shadow( color: Colors.black45, offset: Offset(1, 1), blurRadius: 5) ]), ), ], ), ), ), SizedBox( height: 40, ), Container( margin: EdgeInsets.symmetric(horizontal: 20), height: 250, decoration: BoxDecoration( gradient: LinearGradient(colors: [ Colors.purple.shade200, Colors.purple.shade900 ]), boxShadow: [ BoxShadow( blurRadius: 4, spreadRadius: 3, color: Colors.black12) ], borderRadius: BorderRadius.circular(100).copyWith( bottomRight: Radius.circular(0), topLeft: Radius.circular(0))), child: Column( mainAxisAlignment: MainAxisAlignment.center, children: [ Padding( padding: EdgeInsets.symmetric(horizontal: 30) .copyWith(bottom: 10), child: TextField( style: TextStyle(color: Colors.white, fontSize: 14.5), decoration: InputDecoration( prefixIconConstraints: BoxConstraints(minWidth: 45), prefixIcon: Icon( Icons.email, color: Colors.white70, size: 22, ), border: InputBorder.none, hintText: 'Enter Email', hintStyle: TextStyle( color: Colors.white60, fontSize: 14.5), enabledBorder: OutlineInputBorder( borderRadius: BorderRadius.circular(30) .copyWith( bottomRight: Radius.circular(0), topLeft: Radius.circular(0)), borderSide: BorderSide(color: Colors.white38)), focusedBorder: OutlineInputBorder( borderRadius: BorderRadius.circular(30) .copyWith( bottomRight: Radius.circular(0), topLeft: Radius.circular(0)), borderSide: BorderSide(color: Colors.white70))), ), ), Padding( padding: EdgeInsets.symmetric(horizontal: 30) .copyWith(bottom: 10), child: TextField( style: TextStyle(color: Colors.white, fontSize: 14.5), obscureText: isPasswordVisible ? false : true, decoration: InputDecoration( prefixIconConstraints: BoxConstraints(minWidth: 45), prefixIcon: Icon( Icons.lock, color: Colors.white70, size: 22, ), suffixIconConstraints: BoxConstraints(minWidth: 45, maxWidth: 46), suffixIcon: GestureDetector( onTap: () { setState(() { isPasswordVisible = !isPasswordVisible; }); }, child: Icon( isPasswordVisible ? Icons.visibility : Icons.visibility_off, color: Colors.white70, size: 22, ), ), border: InputBorder.none, hintText: 'Enter Password', hintStyle: TextStyle( color: Colors.white60, fontSize: 14.5), enabledBorder: OutlineInputBorder( borderRadius: BorderRadius.circular(30) .copyWith( bottomRight: Radius.circular(0), topLeft: Radius.circular(0)), borderSide: BorderSide(color: Colors.white38)), focusedBorder: OutlineInputBorder( borderRadius: BorderRadius.circular(30) .copyWith( bottomRight: Radius.circular(0), topLeft: Radius.circular(0)), borderSide: BorderSide(color: Colors.white70))), ), ), SizedBox( height: 10, ), Align( alignment: Alignment.centerRight, child: GestureDetector( onTap: () {}, child: Padding( padding: EdgeInsets.only(right: 30), child: Text('Forgot Password?', style: TextStyle( color: Colors.white70, fontSize: 13)), ), ), ), ], ), ), SizedBox( height: 40, ), GestureDetector( onTap: () {}, child: Container( height: 53, width: double.infinity, margin: EdgeInsets.symmetric(horizontal: 30), alignment: Alignment.center, decoration: BoxDecoration( boxShadow: [ BoxShadow( blurRadius: 4, color: Colors.black12.withOpacity(.2), offset: Offset(2, 2)) ], borderRadius: BorderRadius.circular(30).copyWith( bottomRight: Radius.circular(0), topLeft: Radius.circular(0)), gradient: LinearGradient(colors: [ Colors.purple.shade200, Colors.purple.shade900 ])), child: Text('Login', style: TextStyle( color: Colors.white.withOpacity(.8), fontSize: 15, fontWeight: FontWeight.bold)), ), ), SizedBox( height: 50, ), Text('Don\'t have an account?', style: TextStyle(color: Colors.white70, fontSize: 13)), SizedBox( height: 20, ), Container( height: 53, width: double.infinity, margin: EdgeInsets.symmetric(horizontal: 30), alignment: Alignment.center, decoration: BoxDecoration( border: Border.all(color: Colors.white60), borderRadius: BorderRadius.circular(30).copyWith( bottomRight: Radius.circular(0), topLeft: Radius.circular(0)), ), child: Text('Signup', style: TextStyle( color: Colors.white.withOpacity(.8), fontSize: 15, fontWeight: FontWeight.bold)), ), SizedBox( height: 20, ) ], ), ), ), ), ); } }
Conclusion
That’s everything for this article, hope you like this Flutter login UI form template and have learned everything about how this beautiful Flutter login UI form is implemented. Use it in your flutter app and let us know what you think. We would be looking forward to seeing how you have used it in your app. Look forward to people learning about other flutter cool widgets.
See you in the following articles, in which we will explore other beautiful Flutter widgets and templates. Thank you for reading this post.
We’d be very glad to see you visit our other tutorials on Flutter app development and Python programming. Thank you for reading this article.