In this Flutter tutorial, we’ll learn how to implement Flutter Firebase change password. This feature is used whenever the user forgets the password to log in to his/her account. So in this way, the users are able to reset their password and use the new one to sign in to their account.
What is Flutter Firebase Change Password?
The need for changing/resetting the password is used whenever the user forgets his/her password. In order for the user to log in to his/her account, an email with its specified password is required to pass the authentication test.
We’ll be using the previously created project and adding the feature of forgot password in it. The GitHub link to that project will also be provided at the end.
Resetting Password using Firebase in Flutter (Step By Step)
Follow the below steps for proper implementation of resetting passwords using Firebase.
Note:
If you already have Firebase created, configured, and initialized and have enabled email/password authentication in Firebase, then jump directly to the third step.
Step 1: Setup Firebase
For that, we’ve to create a Firebase project, configure it with our Flutter project and enable email and password authentication. We’ve written a detailed article on it and have used screenshots as well for a proper explanation. So first see it to properly create and configure your Firebase project, then come here again.
Click here to perform the Firebase setup process.
Simply follow the first step which is ‘Step 1: Setup Firebase’. After that, return here to complete the setup process for resetting the password using Firebase.
Step 2: Initialize Firebase in Flutter Project
We’ve created a login and registration feature in Flutter using Firebase in our previous article. You can follow it as we’ll be using the same project and adding the forgot password feature to it.
In order to initialize Firebase in your Flutter project, follow step 2 and step 3 of the previous article. The link to this article is given below:
Click here and follow step 2 and step 3 to properly initialize Firebase and enable email/password authentication.
After it’s done, come back to this article for the implementation of forgot password.
Step 3: Implementation of Flutter Firebase Change Password
1. Forgot Password Button
First, we’ll create a widget that will navigate us to the reset password screen. In our case, we’ve used a Flutter text widget and wrapped it with a gesture detector widget in order to make it clickable. See the below code:
GestureDetector(
          onTap: () {
            Navigator.of(context).push(MaterialPageRoute(
                builder: (context) => ForgotPasswordScreen()));
          },
          child: Text(
            'Forgot password?',
            style: TextStyle(
                color: Colors.black54,
                fontWeight: FontWeight.w500,
                fontSize: 13),
          ),
        )
2. Password Reset Screen

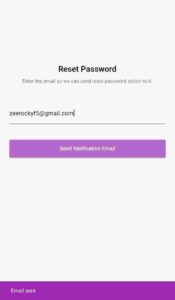
This is the screen that will allow the user to input his/her specific email address using Flutter textfield widget and send it. Let’s now see the function which will process the password reset.
3. Function to Perform Password Reset
 Future<void> sendVerificationEmail(emailAddress) async {
    try {
      await auth.sendPasswordResetEmail(email: emailAddress);
    } catch (e) {
      print(e);
    }
  }
This function will take an email from the user and pass it to the send password reset email method of the FirebaseAuth.instance. We’ve used it inside the try/catch block to catch the error in case something goes wrong.
We’ve used a clickable Flutter container widget to trigger the above method. See below:
  AuthClass().sendVerificationEmail(email).then((value) {
                    ScaffoldMessenger.of(context).showSnackBar(SnackBar(
                      content: Text('Email sent'),
                      backgroundColor: Colors.purple,
                    ));
                  });
This will trigger and send the email given by the user to the password reset method. Then it’ll trigger a Flutter snack bar widget to show that the email has been sent.
Check your Gmail account and also check your spam area, if the email is not displayed in your inbox. Then just click the link and it’ll navigate you to a screen from where you can easily enter a new password.
After resetting the password, you can now log in with the specified email and the new password.
Step 4: Testing
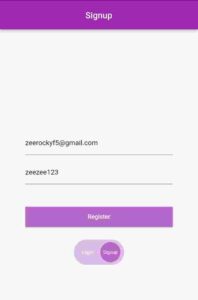
Register a New User

2. Firebase Shows that a new User is Registered

3. Email Sent to Reset Password

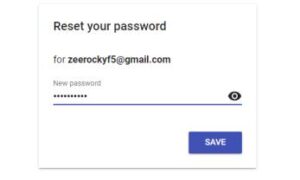
4. Reset the Password Interface
This will show when you click on the link sent to you. It can either be seen in the inbox. If not present, then check the spam messages.

5. User Signed In with the new Password

We can see that we’ve successfully reset the password and have signed in using that new password. So this is how we can easily implement Flutter Firebase change password.
GitHub Link of this Flutter Project
Click here to navigate to the GitHub in which the whole source code of this app is provided.
Hope you like this post. If you like it and have learned something new from it then do feel free to share it. Also, don’t hesitate to ask if you still have any queries regarding the implementation of reset passwords using Firebase in the Flutter app.
Conclusion
In conclusion, we hope you now have a detailed understanding of how to properly implement the Flutter Firebase change password. Do feel free to leave your feedback in the comment section.
We’d also be glad to see you visit our other tutorials on Flutter app development. Thank you for reading this one.
